Wednesday, September 29, 2010

Dreamweaver Peacock with Metallic F/X Sample

I must admit that I don't have much time to make cards, but I like to share about various tips & techniques that I learn from other people. I saw this card from Dreamweaver that uses their new Metallic F/X mica powder and just LOVED the colors!

Lynell Harlow, the owner of Dreamweaver told me that they used copper embossing paste and the following metallic F/X:

Sapphire
Purple Satin
Glacier Lake
Kiwi

Apply the copper embossing paste to the stencil, and let dry. Once dry, place the stencil back in place and stipple Metallic F/X mica powders with a stencil brush (these are much smaller and firmer than the larger stipple brushes and allow you to have more control over where the color goes).

Click here to purchase the Metallic F/X Mica Powders.

Wednesday, September 22, 2010

Holly Berry House Autumn Leaf Medallion Sample


Holly Berry House medallion designs look best when embossed in gold. Here's a beautiful design just in time for autumn cards.

1. Emboss the design several times on different colors of cardstock. The number of times depends on how many layers you want to achieve.

2. Cut out the designs. One of the designs will have the complete image. Cut off more of the design for the next layer (see the image with the green glitter). Cut off even more in the next layer (see the layer with the yellow/gold glitter). Continue until you have the number of layers that you desire.

3. Add adhesive. We used Art Glitter's Designer Dries Clear adhesive with the fine tip to make applying the glue much easier. Apply the glue to one section of the design and then add one color of glitter. Continue adding glue & glitter until the design is covered with glitter. Remember that the parts of the design that are covered by another layer do not need glitter.

4. Set aside to dry. When dry, add pieces of foam tape between the layers to give a 3-D effect and you will have a beautiful card!

Click here to purchase the Holly Berry House Autumn Leaf Medallion rubber stamp.

Monday, September 13, 2010

McGill Dimensional Punches

McGill has come out with some new dimensional punches. Basically, you punch out the shapes and then put the pieces together to form a picture. The dogs on the left were all created from one punch: the dimensional dog punch.

You'll notice that each dog has pieces with different colors. All you need to do is punch out the shapes using different colors of paper.

If you don't want to waste paper, you can just turn your punch upside down and put the paper in the area of the design that you want to punch and just punch out that section.

I wanted to highlight this technique because you can do this with other punches also. Try mixing & matching colors to make your own fun & creative designs!

Click here to purchase the McGill Dimensional Dog punch or to see what other McGill dimensional punches are available!

Friday, August 27, 2010

Hero Arts You Light Up My Life Lamp Cards

This card & the following instructions were designed by Nancy Taylor from Hero Arts. It's not one that you'll find on their web site, so I wanted to take this opportunity to share it with you.

Can these cute little lamps be sophisticated? You bet they can. Did you notice that each lamp is accented with a different technique? The lamp with the cut out leaves and matching shade uses images stamped with a different ink, cut out and glued over the existing images. The middle lamp uses metallic Décor on the base for a dimensional accent. The lamp with the plaid shade uses a yellow colored pencil for a hint of light and a pearl heart for a lamp pull.

Instructions:

  1. Stamp all the lamps in a dark brown ink from the Pumpkin Patch Ink Queue. Trim each lamp into the same size paper.
  2. Stamp the lamp with the leaf base in a rust colored ink queue on a separate piece of paper. Cut out the shade and around the leaves (leave a bit of color around the leaves as you cut). Glue the shade and the leaves over the matching images on the lamp. Add metallic décor accents to each of the circles on the base of the middle lamp. Using a black fine point marker, add a chain (out of little dots) to the remaining lamp and a bit of yellow (to simulate light) with a colored pencil. Attach a pearl heart to the end of the chain.
  3. After gluing the lamp images to a wide strip of Latte cardstock add a few wraps of twine around the bottom of the card securing the twine with a knot on the front of the card.

Tip:
Whenever you are going to add gemstones, accent hearts or other items with sticky back, try not to add over colored pencils. The pencils leave a bit of wax on the paper and the accents may not stick as well.

Hero Materials:

CH173
Hearts Accent Pearls
CH202
Pewter Metallic Decor
MS204
Colorbox Chalk Queue - Pumpkin Patch
PS572
Earth Folded Cards
LP176
Decorative Lamps

Other Materials:
White cardstock, twine, scissors, paper trimmer, yellow colored pencil, adhesive and a fine point black marker

Three Lamps Card

If you prefer bright colors, here's another card using the same lamp rubber stamps:

Instructions:

  1. Stamp the lamps with black ink on a piece of Snow layering paper.
  2. Stamp the images again with various colors of ink on Snow layering paper. Cut out the lamp shades and attach over the black stamped lamps.
  3. Trim the Snow piece and mat with Carnation layering paper.
  4. Stamp the Canvas Stripes with Poppy ink on a Daffodil folded card.
  5. Cut a strip of Carnation layering paper and a piece of Poppy layering paper and attach to the folded card.
    1. Attach the Snow piece to the card and embellish with Colored Gems.
    Hero Materials:
    CH128
    Lavender Gemstones
    CH129
    Teal Gemstones
    CH138
    Pale Pink Gemstones
    CG196
    Canvas Stripes
    AF101
    Memories Ink Pad - Black
    AF179
    Chalk Ink: Iris
    AF180
    Chalk Ink: Punch
    AF181
    Chalk Ink: Poppy
    AF183
    Chalk Ink: Cerulean
    PS556
    Daffodil Folded Cards
    PS597
    Carnation Layering Papers
    PS599
    Poppy Layering Papers
    PS610
    Snow Layering Papers
    LP176
    Decorative Lamps
Click here to purchase the Decorative Lamps Rubber Stamp Set and other Hero Arts products.

Wednesday, June 30, 2010

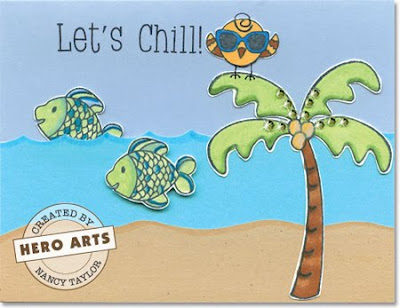
Hero Arts Let's Chill Summer Card

Here's a cute summer card from Hero Arts (stamped by Nancy Taylor). You won't find this card on the web site, so this is a fresh, new idea!

Hero Materials:

CH212
Foliage Mixed Accents
CL438
Let's Chill
PS571
Sea Folded Cards

Other Materials:
Scalloped scissors, Memento Black Ink Pad, pens in a variety of colors for the tree/bird/fish, glue, scissors, brown and white cardstock, fine line pen


Instructions:

  1. Stamp the tree, bird and 2 fish on white cardstock using the Mementos black ink pad. Color as desired with pens, cut out and set aside. The legs and hair swirl of the bird are created after the figures are attached to the card. Stamp the message along the top of a powder notecard in black ink.
  2. Create a scalloped edge on Cerulean paper, adding a highlight along the edge with a blue pen. Adhere the scalloped paper and a single fish, (tucked under the scalloped edge), to the front of a powder notecard. Cut a wavy edge along brown paper to mirror sand and attach over the blue paper.
  3. Glue the colored elements and add green jewels to the palm tree. Using a fine line pen add legs and a top swirl to the bird.

Tip:
Leaving a bit of white around each trimmed image makes it easier to cut and will allow the images to "pop" off the paper.

Click here to purchase the Hero Art's Let's Chill Poly Clear Set.

Monday, May 17, 2010

Hero Arts All Things Wonderful Card


Here's a card made by Jennifer McGuire from Hero Arts. It uses one of the new Poly Clear stamp sets from Hero Arts. This is an easy card to make, especially when you don't have a lot of time!

Instructions:

  1. Turn the Grass folded card inside out, so white is on the outside or just use a white card.
  2. Stamp foliage (from CL428 Earth Flowers Poly Clear Set) repeatedly on card using Soft Leaf shadow ink and Grass chalk ink.
  3. Create flowers on foliage by making 5 "dots" with a marker. Attach Sunshine Mixed Accents to the center of each flower.
  4. Stamp greeting with Black Memories Ink.
  5. Tie ribbon around front of card.

Tip:
For a different look, emboss the brighter green foliage image.

Friday, February 5, 2010

Hero Arts Dandelion Frame Card Samples

I haven't had time to update this blog for quite some time, but I wanted to start this year's first entry with one of Hero Arts new designs.

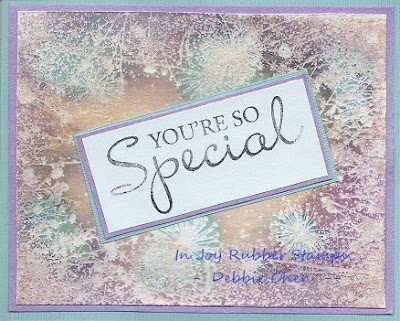
The card on the left was made using one of Hero Arts new 2010 Cling Stamp designs, Dandelion Frame CG153. I think it's a very beautiful stamp.

Even though I don't usually have time to stamp, I made myself stamp at least one card that I could share on my blog! And, I had so much fun that I made TWO cards! Yay!

Anyway, here are instructions for the "You're So Special Dandelion Card":
1. Stamp Dandelion Frame (CG153) with VersaMark ink on white piece of cardstock and then add clear embossing powder and heat.
2. I used Twinkling H2O Radiant Rain daubers (which are a liquid form of Twinkling H2O's) to add color to the image. It gives the cardstock a nice, iridescent look. You could do the same with a paint brush with the regular Twinkling H2O paints. I used a tissue to dab up any extra liquid that didn't adhere to the cardstock and also to blend the colors. The color will only stick to the cardstock where you have NOT embossed. This is called a resist. The embossed image "resists" the color that you are adding and stays white.
3. Stamp "You're So Special" from the Clear Design Set CL380, Truly Appreciated with black ink on light blue paper.
4. Trim & layer on purple cardstock & then on Hanko Tsumugi cardstock (I think the color of the cardstock is called Seafoam).
5. Adhere to card at an angle.
6. Layer stamped cardstock onto another piece of purple cardstock and then onto a Seafoam Tsumugi card.

Here's a secret: The dandelion frame is actually sideways. I really wanted to use the "You're So Special" sentiment, but it was too wide to fit the other way, so I decided to turn it sideways. I noticed that you can't really tell that the design is sideways, so I left it that way.


2nd card: Dandelion Frame - Just Saying Hello Card

1. Of course I had to use different colors and a totally different look for this card. So, instead of stamping first, I decided to add color to the cardstock first. I used the Twinkling H2O's Radiant Rain Dauber in Yellow Rose to add color to a white piece of cardstock.
2. Let dry. Then stamp the Dandelion Frame, CG153, with black ink onto the cardstock. Set aside.
3. Use the "Just Saying hello" sentiment from Clear Design Set CL380, Truly Appreciated. The words come on one line, but I wanted the "hello" on the 2nd line, so I inked the "Just Saying" words with black ink and stamped onto white cardstock. I cleaned the stamp and then inked only the word "hello" with black ink and stamped it UNDERNEATH "Just Saying", as pictured in the sample.
4. Trim and layer onto a yellow piece of cardstock and then layer onto a black piece of cardstock and trim.
5. Wind a black piece of sheer ribbon around the middle of the cardstock and tape to the back.
6. Adhere the "Just Saying hello" sentiment in the middle of the ribbon.
7. Attach stamped piece to black card.