Friday, June 20, 2008

Hero Arts Cupcake with Gems Card


You can make this card for a birthday card, but if you change the cupcake to another design, you can use it for another occasion! Here are the instructions:


1. Cut a 1" piece of ribbon and glue/tape to the center of the card, as shown.

2. Punch out a scalloped circle (2-1/2") from pink cardstock and adhere to the card, just covering the piece of ribbon.

3. Punch out a 1-7/8" circle from kraft cardstock and glue it behind an acetate tag. Take a row of gemstones and lay them on the rim of the tag.

4. Stamp the cupcake on ivory cardstock and cut out the icing & flower together.

5. Stamp the cupcake on pink cardstock and cut out the flower only.

6. Attach the icing to the stamped cupcake with foam tape.

7. Attach the pink flower on top of the ivory flower.

8. Attach a large flower gem over the pink flower and then a small crystal gemstone in the center of the flower.

9. Tie your ribbon into a knot and use a glue dot to adhere to the card, as shown.

10. Stamp your sentiment.

Monday, April 7, 2008

Using Paintstiks & Embossing Paste with Brass Stencils


The most common technique that is used with brass stencils is to dry emboss them (to use a stylus tool to press the design onto the paper. You can use regular ink pads to color the designs, but I will discuss how to use paintstiks to add color.


Paintstiks are oil colors in a solid paint form (shaped like a crayon). It's non-toxic, fadeproof, permanent, and dries in 24 hours. I will show you how to color the pear using paintstiks.

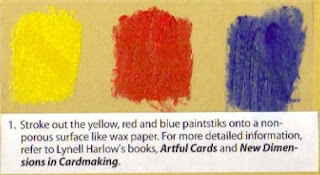
1. Rub the paintstiks (yellow, red, and blue) onto a non-porous surface, like wax paper, as in the picture on above, making a palette to work with.
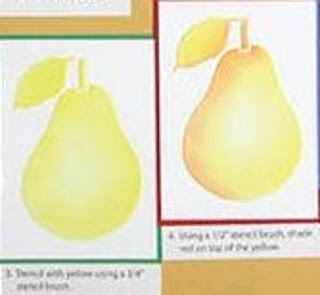


2. Then, using a 3/4" stencil brush, brush the yellow color from your palette and stencil the color on your pear, while the stencil is still in place. See picture on far left.


3. Then, using a 1/2" stencil brush, take some of the red color and shade it on top of the yellow, near the top and on the left side. See the pear on the right side of the picture (it's hard to see, but I think you can see where it is shaded a little darker).
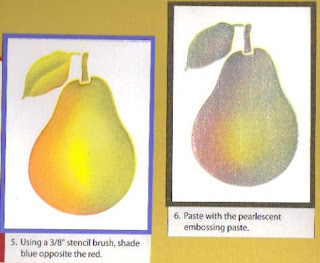


4. Using a 3/8" stencil brush, take some of your blue and shade the right side of your pear (putting the blue on top of the yellow will change the color to green). See picture on the far left.


5. Then, you can leave your pear as it is, or you can add embossing paste on top. The sample on the left uses the pearlescent embossing paste. You could also use translucent embossing paste as well.


6. If you wish to use embossing paste, tape down your stencil with removable tape so that it won't slide.


7. Apply the embossing paste using a palette knife (this knife is nice and flat and is less likely to get paste under the stencil). Apply it as you would apply icing onto cake. When you get a nice even coating, remove the tape from one side of your stencil and gently lift. Removing the tape from only one side will prevent the stencil from slipping. Immediately put the stencil & palette knife in warm water so that the paste will not dry on it. I have found that there is usually some residue that does not come off, but that's ok. You just don't want a lot of paste to dry on it.


So, there you have it. I have shared with you 2 techniques that you can use with your brass stencils. You can use both techniques together, or separately. If you want more ideas and instructions, I would recommend the Dreamweaver DVD called Unique Techniques: Working with Brass Stencils. You can find it in my online store at https://www.injoystamps.com/index.asp?PageAction=VIEWPROD&ProdID=442 or the book: Dreamweaver New Dimensions in Cardmaking - Using Embossing Pastes with Brass Stencils which can be found at https://www.injoystamps.com/index.asp?PageAction=VIEWPROD&ProdID=8638.

Dreamweaver makes embossing paste in a variety of colors: glossy blue, glossy red, glossy green, glossy white, matte black, matte orange, matte yellow, copper, gold, silver, as well as the regular matte white and translucent embossing pastes. They really add a nice effect to your cards.

If you want to see more samples using embossing paste, visit my web site at http://www.injoystamps.com/ and look under Card Gallery and then under Stencils.


Sunday, March 30, 2008

Victorian Treasure Boxes from Holly Berry House


This is a great project for Mother's Day or for upcoming wedding showers. Use them to store small gifts or shower favors!
The box is made from just one stamp that is stamped multiple times. The topper is a medallion design and is optional.
The design looks best (I think) when embossed in gold. You can color with markers or Twinkling H2O's. I think Twinkling H2O's (or a similar product) look nice because of the shimmering look of the paint when it is dried. Cut out all of the pieces and glue the tabs together to form the box. What a stunning way to present a special gift!
Also, based on the design of the stamp, you don't have to always make a box. Just stamp and cut out the design and layer it onto a card. There are other designs available also.
This stamp is now in my eBay store at http://stores.ebay.com/In-Joy-Rubber-Stamps.

Monday, March 17, 2008

Stampendous Jumbo Damask Leaf Card


I made this adorable card at the CHA 2008 Winter Convention at the Stampendous booth. The Jumbo Damask Class A'Peels stickers were very soft & sticky, but I managed to get them on the card. There are a lot of fun ways to use stickers. One of the things I liked about this card was adding flocking to the sticker to give it some texture. Here are the instructions:

1. Brush Brilliance Sky Blue ink pad directly onto the cardboard portion of the mini clipboard (any piece of chipboard will do). Set aside to dry.

2. Place Jumbo Damask Leaves Class A'Peels on a 5-1/4" x 4" Glamour Bling (by Bazzill) panel. Allow stickers to overlap edges of card. Trim excess with scissors.

3. Adhere blue panel to front of white folded card.

4. Adhere Birthday Oval Class A'Peel sticker to blue panel near the bottom.

5. Round Corners on a 2" x 2-1/4" silver cardstock panel.

6. Select medium sized Damask Leaf and place, sticky side down, in a container of black flocking. I thought this was a neat technique. So, now the sticker has fluffy black flocking on it. (You could do the same with glitter too!) Press sticker onto flocking and then remove from container. Press well to make sure that the flocking sticks to the sticker.

7. Use Zip Dry Paper Adhesive in tiny drops on the other side of the sticker and then adhere sticker to the blue clipboard.

8. Apply Big Monogram Class A'Peel to clipboard (I used a "D").

9. Tie a ribbon through the hole at the top of the clipboard clip.

10. Clip blue clipboard to silver panel with clip and add foam tape to the back of layered clipboard. Position at top of card.

Thursday, March 6, 2008

Hero Arts Flowers & Circles Scrapbook Page


I made this page at the Hero Arts booth at the CHA Winter 2008 Convention. I didn't have the photo with me, but I added it after I returned. This is how I made the page:


1. Use a 8" x 8" Brown cardstock sheet. Add photo to the top center. Mount the scallop edge from the ClearDesign Dots & Lines (CL127) set to a large acrylic block. Stamp on both sides of the photo with white ink.


2. Stamp Hero Arts ClearDesign Circular Designs with white ink. Each of the circles is a separate stamp, but we arranged several of the circles on an acrylic block before stamping, making it just like a large background stamp. This saved a lot of time, instead of having to stamp each circle separately. I stamped them in a random fashion, just at the bottom, since most of it would be covered up.


3. Stamp one of the circles, the one with the loops, on a green scallop border (on each scallop), using the green ink from the Primary Chalk Queue from Colorbox. Glue the border to the page.


4. Glue a piece of ribbon ton top of the scallop border. Cut off the edges.


5. Stamp the scallop circle from the Circular Designs set and the words "love you" in brown on the teal scalloped circle, then glue to a kraft circle. Add to layout with pop dots.


6. Add various Hero Arts Summer Flowers (CH150) with mini glue dots. Layer some of the flowers, for added dimension.


7. Add various Small Pearls (CH136) and Medium Pearls (CH137) to the centers of flowers.


8. Take a string of Small Pearls and add to the top of the ribbon, on each side.

Monday, March 3, 2008

More McGill Punch Samples

As I was going through my projects from the CHA show, I found a few more samples that I made using McGill punches.


Here is a card sample on the left. I used the Heirloom Hearts punch and arranged them as shown. You could also consider linking them together for a different look. Arranging them on a brown circle provides a contrasting color and makes the hearts stand out more.


Then, on the bottom, I used a strip of brown paper to match the circle above, and then punched out some keyhole plates. I used just one of the keyhole plate shapes and then stamped a sentiment from Hero Arts ClearDesign that says "Best Wishes". You could use any rubber stamped sentiment or you could use stickers or rubons as well.


This frame on the left is made out of wood. I covered it with paper and cut out the hole in the center. Then, I punched out shapes from McGill's Heirloom Hearts punch and arranged them on the frame. There are many ways that you can arrange the shapes to make very creative projects!


Lastly, I made a 4-panel accordion book. I didn't finish decorating it, but you can see the sections where I used the hearts. Notice the heart corners, where I glued them to brown paper and then cut out the outline shape. It makes the corner stand out more. Also, if you only glue the straight edges of the corner to the paper, you can use it as a photo corner and insert a photo or a piece of journaling paper.

On the last panel, you can see a set of brackets, from McGill's new bracket punch. It punches 4 different styles of brackets, but I only selected one style to use. Now, the book is ready to be embellished with rubons, stickers, stamps, etc.!

I made all of these projects in a class and had fun with the punches. They can be used in a
variety of ways.

In upcoming posts, I will share projects using other products. I just wanted to share the ones about the McGill punches before I forgot about them.


If you're interested in purchasing McGill punches, you can find them in my online store at:
http://www.injoystamps.com

or in my eBay store at:
http://stores.ebay.com/In-Joy-Rubber-Stamps

Saturday, March 1, 2008

New McGill Punches used on Wood Block


After attending my 9th CHA (Craft and Hobby Association) Trade Show in Anaheim,CA, I had so many projects & ideas that I wanted to share, so I decided to start this blog. I will try to share new ideas & techniques (and include pictures whenever possible). I often have people ask me how some project are done, so this will be a good place to share.


Here is a project that I made using a wood block (you could use a paper mache block as well).


1. Use Tim Holtz's Distress Ink on the edges of the block. Then, I covered the sides with printed paper.


2. Glue pieces of printed paper on each side of the block, leaving a little bit of the edge showing (see pictures).


3. Use McGill's Heirloom Hearts Punch and Keyhole Plates Punch on various printed cardstock and then glue to the block. These punches are very fun to use and I have found that there are many different patterns that you can make with them. (See some of the possibilities pictured above.)


4. Embellish with rub ons (or stickers or rubber stamps).


You can use it as a decoration for your desk or add a nice sentiment and give it away as a gift.


Here are the other sides of the block.


You can find these punches on my web site at:
or in my eBay store at: